You can now add custom transfers to your garments (aprons, T-shirts, jackets), bags, and other items even without a printing company. You can easily decorate garments with images that you have designed on your own and printed from your computer. All you require are transfer images, transfer paper, and the instructions provided below.
Here is a Step-by-Step Guide for Making Heat Press Transfers at Home
1. Make Your Transfer
The first thing is to either create or find an image that you would like to use for your transfer. Scan an image into the computer, create one using software, or find an image online. If you choose an image from the internet, you need to ensure that you have full rights to reuse it.
When choosing your images, remember that images that contain dark colors usually show up better on fabrics when compared to the ones with light colors. Keep in mind that a standard home printer does not print the color white. This is because it assumes that you will be printing images on a white sheet of paper, hence it leaves the area blank.
If you choose an image with extremely lightly colored parts, they may end up looking distorted and discolored once the image has been ironed into the fabric. It is thus important to only choose images with dense, dark colors for the best results.

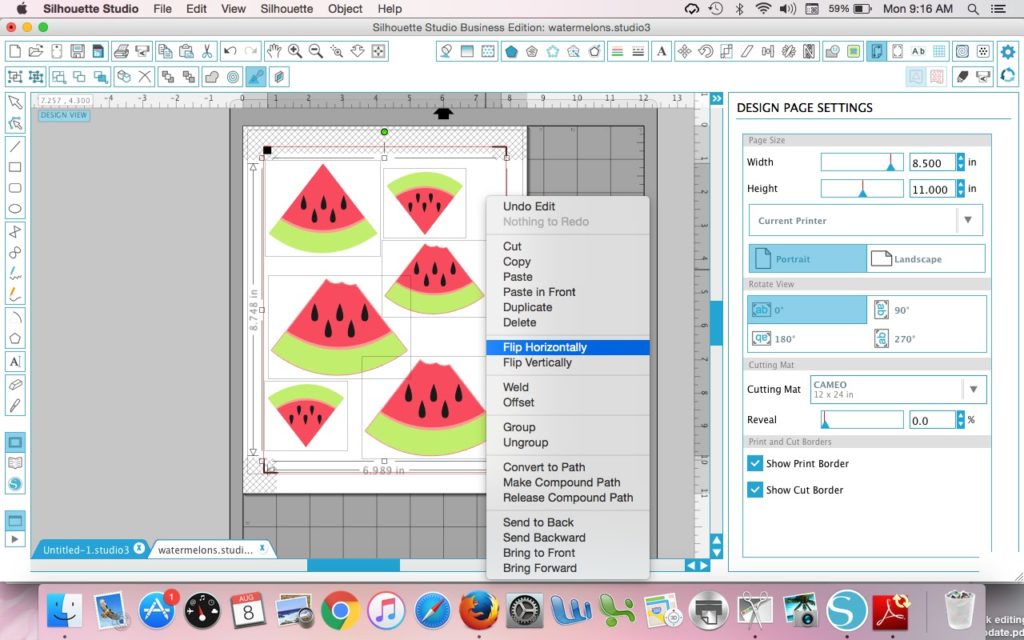
This is how you layout and mirror your image for heat transfer / Photo Credit: Silhouette School Blog
2. Image Editing
You may have to alter some aspects of your chosen image so that it matches your requirements. Using basic image editing software, you can change colors, resize the image, add effects, and even make any other corrections needed until the image looks right.
3. Mirror Your Image
Mirroring your image is only necessary if you have numbers or words on the transfer image. If you fail to mirror an image that contains numbers or words, they won’t appear in the right way on the fabric.
It is incredibly easy to mirror an image. Just use an image editing software. Then click on “Mirror,” “Flip Image Horizontally,” or “Reverse” commands to mirror the image.
4. Find the Right Transfer Paper
Transfer papers are of different variations. Some transfer papers should only be used for light colored sheets and clothes while others are used for dark colored fabrics. Finding the right transfer paper ensures that you get the best results.
Transfer Paper for Light Colored Fabrics
It is designed for fabrics with naturally light colors such as light gray, white, yellow, and others. It is transparent, which means that all parts of the image that contains the color white will appear once you heat press the image on the garment.
It is advisable to use a medium to dark colors when you are using this type of paper. This is to make sure that the image does not appear discolored or distorted on the garment. You can also try trimming close to the edges of the design to ensure that the transparent parts of the paper surroundings never appear on the garment.
Transfer Paper for Dark Colored Fabric
It is designed for fabrics with naturally dark colors such as dark blue, black, and dark gray. It is usually thicker than the transfer paper for light colored fabrics. It has a white backing for ensuring that any light colors on the image appear distinctively on the darker fabric.
When using this type of transfer paper, any background sections of the image will appear and not translucent. Be careful when cutting inside and around the design elements. Make sure that the color of the garment shows through particular spots instead of the color white.
Video: Find out whether you need a light or dark transfer paper
5. Print Your Transfer
Now that you have created a design for printing on your garment, the final step is to print it on the transfer paper. However, before you print your transfer, you should test it by printing it on regular paper. Do this to check whether image colors appear like you expect them to when printed on the fabric. It also helps you determine whether the printer will print the complete image or whether some sections will be cut off.
It is important to note that images may sometimes appear differently when printed than when on your computer. Once you are satisfied with the image, print it on the transfer paper. Ensure that you print it on the correct side of the transfer sheet, which is usually marked clearly. It is advisable to use an inkjet printer when printing your transfer image.
The Bottom Line
Now you know how to create a transfer, how to edit it the right way to suit your needs, and how to choose the right type of transfer paper.
Once you have successfully printed the transfer, the next step is to apply the image onto the garment or fabric using a heat press machine. If you follow the steps outlined here, you will end up with a design that transforms a plain fabric into an eye-catching piece of art.


Leave a Reply